There are some tools available online which allow users to manage CPU and Memory usage in Windows 7. But these tools and software may slow down you PC and in extreme cases; they may mess up you Windows.
In Windows 7, you can easily check the CPU usage with one click without installing any software using PowerShell feature. Windows PowerShell™ is a command-line shell and scripting language designed especially for system administration. To use this to feature to manage CPU usage, just follow the steps below:
First of all, you have to create the script which you can make easily in Notepad. But before that, make a new folder in C:\ and name it utils. Now open Notepad and paste the following code in it.
@echo off
Powershell -command “&{Get-WmiObject -Query ‘Select * from Win32_PerfFormattedData_PerfProc_Process ‘| Select Name, @{Name=’CPU(p)’;Expression={$_.PercentProcessorTime}} | where {$_.’CPU(p)’ -gt 0 } |Sort ‘CPU(p)’ -descending | Format-Table -AutoSize;}”
Powershell -command “&{Get-Process | Select Name, @{Name=’CPU(s)’;Expression={$_.CPU}} | sort ‘CPU(s)’ -Descending | Select -First 5| Format-Table -AutoSize;}”
Powershell -noexit -command “&{Get-WmiObject -Query ‘Select * from Win32_OperatingSystem’ | Select FreePhysicalMemory | Format-Table -AutoSize;}”
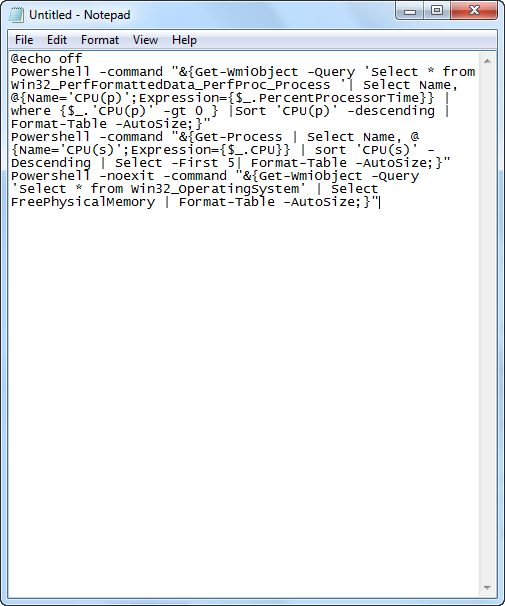
Save this file as
“c: \ utils \ CheckMemoryCPU.bat”
Make sure you save it this way otherwise it will just create a text file.

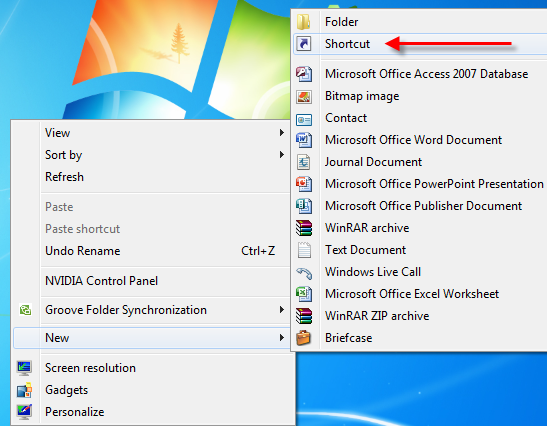
Now, we have to create a shortcut for the script. To do that, right click on your desktop and go to New > Shortcut.
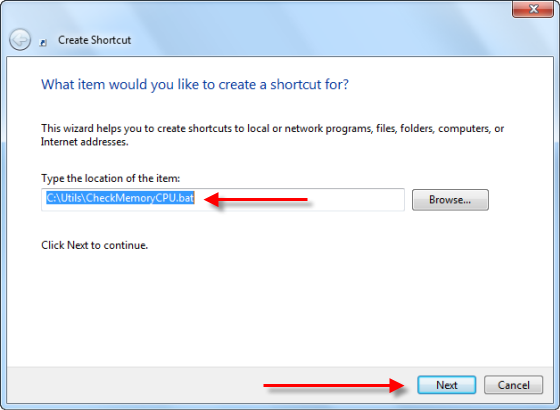
In the location field, locate the file “C:\Utils\CheckMemoryCPU.bat” and click Next.
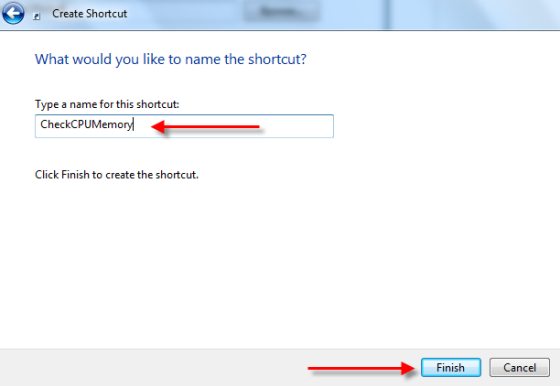
Name it whatever you want. I named it CheckCPUMemory and click Finish. Now you can use it.
Once the icon is created, open it and it will show you something like this:
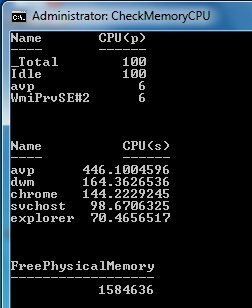
It shows you the total and idle process along with other process which are using memory. The second list shows other applications which are running and how much memory they are using.


Comments
9 responses to “Easiest way to Monitor CPU and Memory Usage in Windows 7”